Monday, 28 February 2011

The prints of darkness

 BRIEFING;
To create artifact, using 2 print processes which we did in stage one, it has to be based on darkness, we were told to think outside the box, and not think of the obvious darkness subjects.

My first step was to create moodboards, on 2 subjects i chose, which were inscurity and binge drinking.

Moodboards


For the prints of darkness I researched outside the box of darkness, so I was thinking of dark subjects ans I chose binge drinking and inscurity.
Binge drinking, causes all sorts of crimes, but illness also.
Inscurity leads to depression, and people doing things to there body which isn't healthy.

our group mind map of darkness, which are all quite obvious subjects
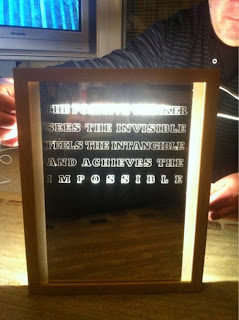
My idea is to create a typography mirror, after looking into incscurity, i picked a positive  quote and using the mirror as a reflection of the person, to read to the positive quote, my 2nd print process, is foiling a poster which is to be seen in my mirror.
STAGE 1, creating type for mirror
I chose a quite a 'positive typeface' which is chunk, which is similar to the ben and jerrys typeface, which is happy brand.
I used illustrator to create the type for the mirror, imported this file in the program which the laser cutter uses.

I had 3 smaller mirros to experiment on, which all came out succussfully, I used these experiments to aline the type in the mirror.
The next stage was to create the final mirror, which I used a3 sized mirror, I placed the mirror on a lightbox, which created a nice effect, so i ended making a lightbox, I brought a frame and 2 lights, and built this lightbox.
 After creating a lightbox, it looked better with a frame inside, so I added this frame.
This is the 2nd part of idea, which is the poster to be foiled in gold backwards, so it reflects on the mirror.
Frame and poster working together, which was the point of the idea, to reflective postive quotes.

EVALUATION
The print process brief’s have really worked well for me, as normally I get my head stuck on a computer, only because I am comfortable using the software on the computers, so being set the briefs has given me the chance to try something else, which has been great, I feel that in the 2nd stage of the brief I really felt comfortable with the processes I chose, which was laser cutting and foiling, this only because I experimented in the 1st stage, the only part where I have let myself down, is showing the process in this blog, only because I got stuck on just making the piece, and was also working on other projects we had been set outside of this brief.
But I was happy with the final piece, I was trying to show how I could flip the negative mirror, when girls look at thereselves in the mirror, and feel inscure by using positive quotes.
If I had to do this again, I would create a sketchbook of my process and go into more detail and also take more time in my final piece to make a tidy finish.

Monday, 14 February 2011

Lino print - Georg Baselitz

Georg Baselitz german artist did a great piece which was featured in the tate collection 'female nude on a
Kitchen Chair 1977-9
Linocut on paper
image: 2021 x 1370 mm
on paper, print


Lino print -Eileen Schaer

Eileen Schaer prints are handed printed on to japanese tosa shi paper using a traditional japanese burin which consists of a bamboo leaf stretched and tied over a circular disc.

Born and educated in liverpool

Her work is quite personal, and real nice hands on feel to her work, she hs used lino printing well

Tuesday, 8 February 2011

Flock and foil


I did the flock and foil  process after screen printing, as you have use the same screen to get the glue on to your material, apply like applying ink on the screen print, the glue takes about half an hour to dry, to take your glued material, to the heat press along with the flock or foil, place your glued material onto the heat press then take your flock or foil and place it on top of the dried glue material, then place down the heat press cover and wait for the ring tone to tell you to lift up the cover.

This process was quite fun, you get some nice clean work from the foil, and also could see the flock on some t shirts, there is plenty of potential in flock and foil printing.

Laser cutting


Out of all the print processing we did, laser cutting had to be my favourite, I didn't anything huge or
complicated, but from working on it, I could see the potential to create some great pieces, 2D and 3D.
My outcomes from screen printing, were 2 different matrials, I used Mountboard and wood, I engraved on the mountboard, which gave a nice gold looking effect, and on the wood I Cut out and engraved which looked really good, I think I would use would again maybe with a more  complex design.

My process was to collect materials for the laser cutter, then vector my image with outlines in illstrator, then saved this and opened in the laser cutting program, then followed the instructions given to finish the process in the laser cutting machine.

Screen Printing

I found this youtube video to help in the future to help with the screen printing, process.

SCREEN PRINTING PROCESS
- 1, Create image, vectorise image to black, and print image

- 2 Scan image and print on to asitate
- 3 Clear screen, next step is to expose the screen
- 4 tape outside around the screen, to make sure no ink leaks
- 5 place material, your using under the screen
- 6 place ink on the top of your screen, wipe downwards and pull up
repeat this twice or 3 times


My first print

My first was on some leather sort cloth, which i really liked, I found this was my best outcome,
we had quite a dodgey screen, had many holes, which was quite fustrating.

2nd print

Was not happy with the 2nd print, only because of the splatters from the screen, we only had the screen for the night, because someone had our screen, so had to wait till late to get a screen, but next time if theres holes, I should cover with tape., do like the black on red though.

3rd print

This is when a print fails, DO NOT OVER DO THE INK, from this print I realised you should NOT, use to much ink, or you end up with mess.

Wednesday, 2 February 2011

Lino Printing

INO PRINT 1 - 1 1st print was white, and printed over in red with a slight change of position, I found it produced a good looking outcome.

LINO PRINT 2, for my 2nd lino print, I used corrugated paper, which created my favourite effect, I will try different colours with this paper though next time, Also I tried creating a 3d effect with this print on Photoshop.

I used wet paper for my 3rd lino print, and created a emboss effect, which really quite like, this was created from the wet paper and using more paint than normal.

4th Lino, was using plain paper, with less paint than the last print, which created a nice worn, but tidy edge piece of work.
To start the Lino press, you have to engrave your image, or illustration into the lino, you can create a negative effect by digging out the image, or postive by digging around the image.
After going through this process, the next step is to apply 
the ink to the lino, choose your paper, then take it to the press.

One of the other ways to lino print, youtube video, which is good way to print, but could take longer.